Nove-Noga Info Post
Adding Text Logos to Your Image with GIMP
If you found this page useful,Please Like and Share. Thank you.
Nove-Noga!

 Adding Text Logos to Your Image with GIMP.
For the business person, it is common to want to bring our business efforts to the eyes of our visitors at IBO Toolbox, Facebook and other Social Networks. On the other hand, people tend to do business with those they know, like and trust. It is difficult to trust those who are hiding their Identity behind a Logo. This can be even more difficult when that Logo is common to many people.
My own problem was somewhat different. My Name is Curtiss Martin. When I started my efforts on the Internet, all I could find was information on a football player of the same name. That was one of the reasons for setting up Nove-Noga. I wanted a search term where I would be easy to find.
*Note: Novenoga is a word we have used in our family for decades. It was created from the first two letters of each word in the famous quote by Benjamin Franklin, "NOthing VEntured, NOthing GAined." We pronounce it like two words, "NOva Noga." To us, it means that there are times when the only thing that makes sense is to take advantage of the opportunity that has been presented to you. This was the thought rolling through my mind when I started seeking a way to earn a living on the Internet. Unfortunately, the city of Noveno, GA, already had novenoga.com in place. Then it came to me. Nove-Noga. Short for NOthing VEntured - NOthing GAined. Nove-Noga.com*
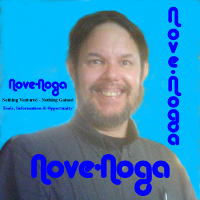 My next problem was getting people to notice that Nove-Noga was on the Internet. IBO Toolbox was a step in the right direction. I decided that part of what I should do was to add a text Logo to the image that I was using. At one point in my experimentation, there were three Logos on it. Dennis Thorgesen commented on them in a PR. He pointed out that three Logos was pushing it. The truth is, I put the third one in to address the composition and balance. After thinking over what he said, I elected to redo it to the current image.
 See Dennis Thorgesen's PR Building a brand; Branding tips for IBO members.
For those of you that really like your Logo, this method will allow you to add your Logo to your image. That way, we can see your smiling face and you still get to showcase your Logo.
Notation Methods:
Each instruction line is usually in two parts; Verbal then Symbols.
"#)" The Symbol line will begin with "#)".
EG: #) >>File->Open("Name" = 'work image')[Open/Enter]
">>" Means Select, from the main menu if no {Dockable Dialog} or other source is indicated.
The square brackets mean [click this button].
The parenthesis mean (your entered info) E.G. (picname.xcf)
"Rt>" Means Right Click with your Mouse
"->" Click or Select
"->>" Double Click
">v" Click DropDown button
"^>" Shift + Click
" "literals" " The quotes usually contain what has been referred to as "Literals" meaning that that is exactly/literally what you should see.
" 'Described Item frequently an Icon' " EG: IBO Edit Icon 'Paper&Pencil'
[Action/Enter] is for the Option to Click the button or Hit the Enter key.
"*NB:" is for the Latin "Note Bene" which I interpret as Good Note or Note Well.*
"EG:" is for the Latin "Exempla Gratia" I use it when illustrating an example. See above.
Selection Synonyms: Click, Select, Choose,...
 *-*-*-*-*
 1) Fire up your GIMP Tool.
#) >>GIMP
2) Select Working image.
#) >>File->Open(MyPicture)
3) Select Working area of image, 1200x1200 px.
#) >>{Toolbox}[Rectangle Select Tool]
*-*-* Pick a point on your Image to set the corner. Pull a box 1200x1200 px. See the rectangle dimensions at the bottom of work area. Note: >>Edit->Undo to undo your selection so you can try again. *-*-*
4) Copy Selected area.
#) >>Edit->Copy
5) Create a New Image from Selected Copy.
#) >>File->Create->From Clipboard
6) Save New file in MyDocuments/GIMP/NewPic. Be careful of directory/folder
#) >>File->SaveAs ("NewPic1.xcf") ("Places"="My Documents")->>("Name"="GIMP") [Create Folder] "NewPic" [Enter] [Save/Enter]
*NB: GIMP defaults to "My Documents".
*-*-* I needed to airbrush the background out for this project. I am choosing to stay with my background color, Deep Sky Blue (#00bfff) *-*-*
7) Select foreground tile and set color (#00bfff)
#) >>{Toolbox}[Foreground and Background Colors[Foreground Tile] ]{Change Foreground Color}HTML Notation(00bfff)[OK]
*-*-* We will use the Airbrush tool. There are all kinds of adjustments in {Tool Options}. Have fun. If you get nervous, just SaveAs another file, so you have an easy point to go back to. It is easy to back up from a slip. #) >>Edit->Undo *-*-*
8) Select the airbrush tool and airbrush out the background.
#) >>{Toolbox}[Airbrush Tool]
*NB: If your {Tool Options} disappear, >>Windows->DockableDialogs->ToolOptions.*
9) Save before beginning next step.
#) >>File->SaveAs(NewPic2.xcf) [Save/Enter]
*-*-* There are many fonts to choose from. I am going to start with the Nove-Noga Logo in Alba Matter. You can do as you wish. Be advised to take notes of your choices. *-*-*
10) Set up Text Tool; Font=Alba Matter Size 200px Justify=Centered (Nove-Noga)@0,5
In {Toolbox Tool-Options} dialog select [Text Tool] (the "A" Icon).
#) >>{Toolbox Tool-Options}[Text Tool]
In {Tool Options} Set text color to (0000ff).
#) >>{Tool Options}[Color]{Text Color}HTML notation (0000ff)[OK]
In {Tool Options} dialog Click the Font Button and choose Font.
#) >>{Tool Options} [Aa]-> "Alba Matter"
In {Tool Options} dialog Set Size to 200 px
#) >>{Tool Options} Size = 200 px
In {Tool Options} dialog set Justify to Center
#) >>{Tool Options} Justify = [Centered]
#) ->@0,5(Nove-Noga)
*-*-* In order to change to another line of text, you can click outside of the current text areas or change tools and come back in. I dodged to the background layer to clear the connection before making changes to the text tool. *-*-*
*-* Repeat as necessary. *-*
11) Position your text entries roughly with the Move Tool.
#) >>{Toolbox}[Move Tool]
Select layer then pick up the selected item with a Shift+Click.
#) >>{Layers-Gradients}(text layer)^>(text element) and move to position
*-* Repeat as necessary. *-*
12) Center the elements with Alignment Tool.
In {Toolbox} Select [Alignment Tool]
#) >>{ToolBox}[Alignment Tool]
Drag a box over the target and use the centering tile.
#) (Box the Target)>>{Tool Options}[Align Center of Target]
*-* Repeat as Necessary. *-*
13) Save before beginning next step.
#) >>File->SaveAs(NewPic3.xcf) [Save/Enter]
14) Merge combined elements together. Right Click on top layer in {Layers-Gradients} and select Merge Down from popup menu.
#) Rt>{Layers-Gradients}(Top text layer)->Merge Down
*-* Repeat as Necessary *-*
15) Position your text entries roughly with the Move Tool.
#) >>{Toolbox}[Move Tool]
Select layer then pick up the selected item with a Shift+Click.
#) >>{Layers-Gradients}(text layer)^>(text element) and move to position
*-* Repeat as necessary. *-*
16) Save before beginning next step.
#) >>File->SaveAs(NewPic4.xcf) [Save/Enter]
17) Merge all elements together
#) Rt>{Layers-Gradients}(Top text layer)->Merge Down
*-* Repeat as Necessary *-*
18) Save before beginning next step.
#) >>File->SaveAs(NewPic5.xcf) [Save/Enter]
19) Export full size image to JPEG. Default is to png.
#) >>File->Export(NewPic5.jpg)[Export/Enter]{Export Image as JPEG}[Export]
20) Reduce image to 200x200 px.
#) >>Image->ScaleImage{Scale Image}Width(200)[Tab][Scale]
21) Save before beginning next step.
#) >>File->SaveAs(NewPic6.xcf) [Save/Enter]
22) Export 200x200 image to JPEG.
#) >>File->Export(NewPic6.jpg)[Export/Enter]{Export Image as JPEG}[Export]
*-*-* Now you have a 1200x1200 image if you need it and a 200x200 image for IBO Toolbox. *-*-*
23) Upload your new image to IBO Toolbox.
#) >>IBO Toolbox[Profile][Change Profile Image] Upload your image from your computer with [Browse}. [Next][Finish]
Your IBO Toolbox profile image is one of the first steps to branding yourself. See Dennis Thorgesen's PRs for more information about branding. For this reason, you may want to reconsider any image in the wrong orientation, simply a Logo or conveying the inappropriate presentation to prospective business Associates.
 For more information on GIMP
and a working list of my GIMP Tutorials,
go to:
http://nove-noga.com/GIMP.html
Time is your most precious commodity.
Do as much with your time as you can.
Nothing Ventured - Nothing Gained.
Nove-Noga!
