Nove-Noga Info Post
Free Business Cards with GIMP.
If you found this page useful,Please Like and Share. Thank you.
Nove-Noga!

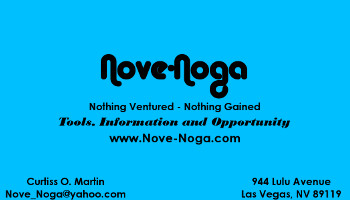
 Free GIMP Nove-Noga Business Card.
Whether you like the capability of printing your own business cards from home or you just want a way to work out the design before you send it to the printer, the *Free GIMP tool is an excellent place to start. Today I am going to create a business card with the *Free GIMP (GNU Image Manipulation Program).
*Free Means FREE!


Create Your Business Card with the Free GIMP Tool.
Each instruction line is usually in two parts; Verbal then Symbols.
"#)" The Symbol line will begin with "#)".
EG: #) >>File->Open("Name" = 'work image')[Open/Enter]
"*NB:" is for the Latin "Note Bene" which I interpret as Good Note or Note Well.*
"EG:" is for the Latin "Exempla Gratia" I use it when illustrating an example. See above.
Selection Synonyms: Click, Select, Choose,...
For more info on notation and standard practices see: "GIMP Notation and Descriptions"
*-*-*-*-*-*
The project today is to create a business card using the information and structure that I used in the new logo for the Nove-Noga website.
*-*-*-*-*-*
1) Fire up the Free GIMP tool.
#) >>GIMP
2) Open a New File FromTemplates, choose a 300 ppi (Pixels Per Inch) image and reset to the size of a business card. 3.5 x 2 Inches or 1050 x 600 px (Pixels).
Select, from the menu, File->New. From the {Create a New Image} dialog select from the Template DropDown Menu any of the 300 ppi templates. Set Width to 1050 px and Height to 600 px. Important: Verify that the units are in px (You can change units with the button to the right of Height.) Click [OK] to create your new untitled project.
#) >>File->New{Create a New Image}>v [Template = (A3 (300ppi))] Width=1050, Height=600 >v[px=pixels] [OK/Enter]
*-*-*
We will create the central text first.
Centered in Card:
Nove-Noga; Font=Alba Matter; Size=100
*-*-*
3) Select the text icon [A] from {Toolbox-Tool Options}. In the tool panel below, click [Aa] to open the font selection box. Select your font then set the size of your first line of text. Click anywhere on your image surface and enter your first line of text.
In {Toolbox Tool-Options} dialog select [Text Tool] (the "A" Icon).
#) >>{Toolbox Tool-Options}[Text Tool]
In {Tool Options} dialog Click the Font Button and choose Font.
#) >>{Tool Options} [Aa]-> "Alba Matter"
In {Tool Options} dialog Set Size to 100 px
#) >>{Tool Options} Size = 100 px
In {Tool Options} dialog set Justify to Center
#) >>{Tool Options} Justify = [Centered]
Click on Work area and enter text "Nove-Noga"
#) {Untitled}("Nove-Noga")
*-*-*
Nothing Ventured - Nothing Gained; Century Gothic Bold; Size=30
Tools, Information and Opportunity; Font=Bodoni MT Heavy Italic; Size=30
Nove-Noga URL; Font=Century Gothic Bold; Size=36
*-*-*
4) Repeat Step 3 as necessary until you have created all of the lines for the center of your business card. To start a new line of text, click anywhere on your work area then reset the {Tool Options} as desired for the new line of text. Don't worry too much about placement or size yet.
*NB: I am going to assume that you will want to change the size and position of each line of text. I am using four lines to begin with.*
#) Repeat Step 3 as necessary.
*-*-*
Look at the {Layers-Gradients} dialogue box. If you don't see it (mine is on the right side where it started) select Windows-Recently closed docks->"Layers...." To re-open the {Layers-Gradients} dockable dialog.
*-*-*
5) Assuming you need to edit one or more lines, mouseover to the Entry in {Layers-Gradients} that you want to change. Right click on the element entry. Select Text Tool from the top of the Menu Display. You will note that in {Toolbox-Tool Options} the Text Tool options are displayed with the font and size for your current selection. This is where you need to make any changes.
For Example, I am going to change the Font Size for "Tools..." from 30 to 36.
#) Rt>{Layers-Gradients}('text line "Tools..."')->TextTool
In {Tool Options} dialog Set Size to 36 px
#) >>{Tool Options} Size = 36 px
6) Select the Move Tool from {Toolbox}. It looks like a pointed plus sign. Select the desired entry in {Layers-Gradients}. Remember: to move selected layers in GIMP, position your mouse then press the shift key while clicking. You will be holding and moving the selected layer as long as the left mouse key is down.
In {Toolbox} Select the Move Tool.
#) >>{Toolbox}[Move Tool]
From {Layers-Gradients} Select the Element to move.
#) >>{Layers-Gradients}('Element/text line')
In the {Untitled} Work area, Shift-Click the Element and Drag to desired position.
#) ^>'Element'; Drag to approximate position desired.
7) Select the Alignment Tool (Square with pointers on all four sides, next to Move Tool.)
In the work area, drag a box across your text element.
#) >>{Toolbox-Tool Options}[Alignment Tool] then Draw a box around the selection to be centered.
In {Tool Options} (Now Titled Align) Choose the center icon [>|<] to center your text across the background.
#) >>{Tool Options}->[Horizontal Center] *NB: It looks like [>|<]*
Repeat as necessary for each layer.
#) Repeat as necessary.
8) Select the move tool again and make adjustments to each line as desired vertically under your primary element "Nove-Noga".
#) Adjust with Move Tool as necessary.
*NB: As you use the Move Tool, there is an indicator at the bottom of the {Untitled} work area that indicates the "move" position in pixels. Maintain the first indicator at "0" as you adjust the vertical. EG: Move 0,0 becomes Move 0,-15 as you pull the element up the page.*
9) Repeat steps 7 and 8 until you are pleased with the balance of this central element.
10) Save your {Untitled} as "Card1.xcf" in /my documents/GIMP/Card/. Remember that the GIMP will default to MyDocuments. I always create a Project file in my GIMP folder for the current project.
#) >>File->SaveAs ("Card1.xcf") ->( "Places" = "My Documents") ->>("Name" = "GIMP") ->[Create Folder] ("Card")[Enter][Save/Enter]
11) Next Merge the related elements together.
In {Layers-Gradients} right-click on the top layer that you want to merge down, Select Merge Down from the Menu Display. Repeat as necessary.
#) Rt>{Layers}Top Layer ->Merge Down
#) Rt>{Layers}Top Layer ->Merge Down
#) Rt>{Layers}Top Layer ->Merge Down
12) Use the Alignment tool to center your new composite layer.
Select the Alignment Tool.
#) >>{Toolbox}[Alignment Tool]
Drag a box over the target and Center Horizontally.
#) (Box the Target)>>{Tool Options}[Align Center of Target]
Center Vertically
#) >>{Tool Options} [Align Middle of Target]
*NB: The box for my Composite Layer extends above the visual top of my logo by about 20 pixels. I am going to adjust for this with a Distribute Tile in {Tool Options}.*
In {Tool Options} Set Offset=-10 and Distribute Vertical Centers of targets.
#) {Tool Options} Offset=-10
#) >>{Tool Options} [Distribute vertical centers of targets]
13) Save {Card1.xcf} as {Card2.xcf}
#) >>File->SaveAs{Save Image}("Card2.xcf") [Save/Enter]
Bottom Left:
Curtiss O. Martin
Nove_Noga@yahoo.com
And Bottom Right:
944 Lulu Avenue
Las Vegas, NV 89119
Century Gothic Bold; Size=30
14) Select Text Tool again and setup for Font= Century Gothic Bold; Size=30; then key-in the text for the bottom left of the card with an [Enter] between the lines.
In {Toolbox Tool-Options} dialog select [Text Tool] (the "A" Icon).
#) >>{Toolbox Tool-Options}[Text Tool]
In {Tool Options} dialog Click the Font Button and choose Font.
#) >>{Tool Options} [Aa]-> "Century Gothic Bold"
In {Tool Options} dialog Set Size to 30 px
#) >>{Tool Options} Size = 30 px
Click on Work area toward bottom left corner and enter text "Curtiss O. Martin [Enter] Nove_Noga@yahoo.com"
#) {Card2.xcf}("Curtiss O. Martin [Enter] Nove_Noga@yahoo.com")
15) Select a point on the bottom right side of the card and key-in the bottom right text.
#) {Card2.xcf}("944 Lulu Avenue [Enter] Las Vegas, NV 89119")
16) Select the Alignment tool again and position these two text elements at the corners of the card.
Select the Alignment Tool.
#) >>{Toolbox}[Alignment Tool]
Drag a box over the left hand target.
#) (Box the Target)
Set Offset=20 and Distribute Left Edges of targets.
#) {Tool Options} Offset=20 [Distribute left edges of targets]
Set Offset=-20 and Distribute Left Edges of targets.
#) {Tool Options} Offset=-20 [Distribute bottoms of targets]
Drag a box over Right Hand Target *NB: Offset still =-20*
#) (Box the Right Hand Target)
Distribute Right Edges of targets.
#) {Tool Options} [Distribute right edges of targets]
Distribute Bottoms of targets.
#) {Tool Options} [Distribute bottoms of targets]
17) Save {Card2.xcf} as {Card3.xcf}
#) >>File->SaveAs{Save Image}("Card3.xcf") [Save/Enter]
18) Congratulations, you have created your prototype business card. Now you can send it off to be professionally printed. Find out what format they prefer.
From Files, choose Export. The default is png. You may prefer jpg.
#) >>File->Export{Export Image}("Card3.jpg")[Export/Enter]{Export Image as JPEG} [Export/Enter]
Your new card is ready to send to the printing company or, you can do what I did. My printer will allow me to front feed card stock. The only problem is that they don't always go through square. I will need cutting guides to make pretty cards. I am going to lay out my cards in the landscape format. I can create a dozen cards at a time that way. I will describe all of this in my next press release. Business Cards by the Dozen with GIMP
 For more information on GIMP
and a working list of my GIMP Tutorials,
go to:
http://nove-noga.com/GIMP.html
Time is your most precious commodity.
Do as much with your time as you can.
Nothing Ventured - Nothing Gained.
Nove-Noga!


