Nove-Noga Info Post
Nove-Noga on Changing Your Facebook Cover Page.
If you found this page useful,Please Like and Share. Thank you.
Nove-Noga!

 Nove-Noga on Changing Your Facebook Cover Page.
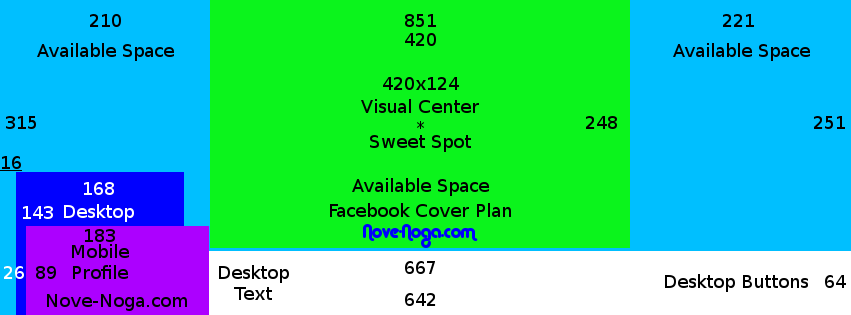
 Your Facebook Cover Photo is the Center of your Facebook Efforts. The only thing worse than a poorly designed image, is no image at all. The Facebook Cover Plan shows the basic layout of your Facebook Cover Photo. The Dark Blue represents the Profile Photo on Desktops. The Purple represents the Mobile Profile Photo. The White represents the area used by Facebook on Desktop Displays for Text and Buttons. The Green represents the Visual Center of the Display and the Light Blue represents the remaining available space.
*Note: For a less technical presentation see:
Getting Your Facebook Cover Photo Right by Nove-Noga.*
The Numbers:
Facebook Cover Photo - 851x315 Pixels.
Visual Center - 420x248 Pixels at 210 Pixels from the Left Edge.
Left Center - 210x315 Pixels minus intrusions by Profile Photos and Desktop Text and Buttons.
Right Center - 221x251 Pixels.
Desktop Profile Photo - 168x143 Pixels at 16 Pixels from the Left Edge.
Mobile Profile Photo - 183x89 Pixels at 26 Pixels from the Left Edge.
Desktop Text and Buttons 667x64 Pixels.
*Note: These Observations were made from my Desktop and an Android Phone. If you have any pertinent observations, feel free to leave a comment.*
Facebook Cover Plan from Nove-Noga
Click Image. Save Full Size Image to your GIMP work area.
{GIMP Alignment Tool}
Area and Offset:
Visual Center Offset [-5]
Left Center Offset [-320]
Right Center Offset [316]
*-*-*-*-*-*-*
Notation Methods:
Each instruction line is usually in two parts; Verbal then Symbols.
"#)"The Symbol line will begin with "#)".
EG: #) >>File->Open("Name"= 'work image')[Open/Enter]
">>"Means Select, from the main menu if no {Dockable Dialog} or other source is indicated.
The square brackets mean [click this button].
The parenthesis mean (your entered info) E.G. (picname.xcf)
"Rt>"Means Right Click with your Mouse
"->"Click or Select
"->>"Double Click
">v"Click DropDown button
"^>"Shift + Click
" "literals"" The quotes usually contain what has been referred to as "Literals"meaning that that is exactly/literally what you should see.
" 'Described Item frequently an Icon' " EG: IBO Edit Icon 'Paper&Pencil'
[Action/Enter] is for the Option to Click the button or Hit the Enter key.
"*NB:"is for the Latin "Note Bene"which I interpret as Good Note or Note Well.*
"EG:"is for the Latin "Exempla Gratia"I use it when illustrating an example. See above.
Selection Synonyms: Click, Select, Choose,...
For more info on notation and standard practices see: "GIMP Notation and Descriptions"
*-*-*-*-*-*

*-*-*-*-*-*
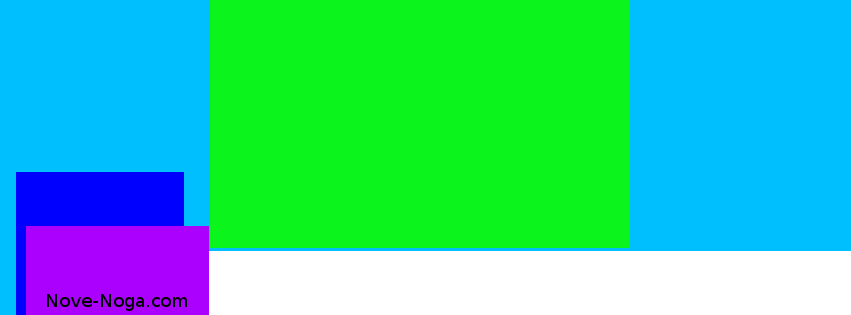
The Facebook Cover Plan from Nove-Noga is full of marvelous details for the detail oriented person, but when it came right down to using it to create a new Facebook Cover Photo, all of that information got in the way. Feel free to use a copy of Facebook Cover Base from Nove-Noga as a guide in your efforts. You are welcome to share it and links to this information. Just remember that it came from Nove-Noga.
Facebook Cover Base from Nove-Noga
Click Image. Save Full Size Image to your GIMP work area.
FBcoverBase851x315.png
1) Save an 851x315 Pixel Copy of Facebook Cover Base from Nove-Noga to your computer.
#) Click {Facebook Cover Base from Nove-Noga}Rt-Click the Image Displayed and Select "Save Image As..."(or whatever is appropriate for your Browser.)
*Note: I Recommend saving Facebook Cover Base from Nove-Noga to the GIMP Folder where you will be creating your Facebook Cover Photos.
EG: MyDocuments/GIMP/FBcover
*Note: Preparation for this project assumes that any images you want to use are already the correct size and located in your GIMP Folder. For information to help you build these elements, explore "GIMP Tutorials"
2) Fire up your GIMP tool.
#) >>GIMP
3) Open FBcoverBase851x315.png
#) >>File->Open ("Places"="MyDocuments") ->>("Name"="GIMP") ->>("Name"="FBcover'") ->("Name"=' FBcoverBase851x315.png ') [Open/Enter]
4) SaveAs your first Version of the Page you are working on. EG:FBcover1 #) >>File->SaveAs ('FBcover1.xcf') [Save/Enter]
*Note: On the first save of any opened file, it will default to the location where you Opened it. Choose your target carefully. If it is the first item in the Project, you may need to create a folder for it. *
5) Paste or Create your Layers into {FBcover1.xcf}. For specific steps, see: "GIMP Notation and Descriptions"or Previous Info Posts at "GIMP Tutorials"
5a) Paste an existing Layer or Image into {FBcover1.xcf}
*Note: Each Layer Pasted into {FBcover1.xcf} will land in the upper left corner.
#) >>File->Open->("Name"='CoverPic1') [Open/Enter]
*NB: The File you opened is always behind the one you opened it from.
Select {'CoverPic1.xcf'}.
#) >>{'CoverPic1.xcf'}
Copy the Visible Image to the Clipboard.
#) >>Edit->CopyVisible
Select {FBcover1.xcf}.
#) >>{FBcover1.xcf}
Paste Clipboard contents into {FBcover1.xcf}.
#) >>Edit->PasteAs->NewLayer
*Note: Assumes you are going to Center this Layer in one of the Centered areas.
Use the Move Tool to drag your new layer to the approximate position on the page with special attention to the Vertical position.
#) >>{Toolbox}[Move Tool]
Select ('desired element/layer') from {Layers-Gradients}.
#) >>{Layers-Gradients}('desired element/layer')
Position Cursor over selected element and shift+click to drag the element to desired position.
#) ^>('selected element') Drag to desired position
Use Alignment Tool to Center Layer in area: Visual Center: Offset=-5; Left Center: Offset=-320; Right Center: Offset=316.
#) >>{Toolbox}[Alignment Tool] Click element
#) Set Offset: Visual Center: Offset=-5; Left Center: Offset=-320; Right Center: Offset=316.
#) >>{Tool Options}[Distribute vertical centers of targets]
5b) Set up Text Tool and Add Text Elements. This example is the word "Nove-Noga": Font=Alba Matter Size 15px Justify=Centered (Nove-Noga)@Approximate Position.
In {Toolbox Tool-Options} dialog select [Text Tool] (the "A" Icon).
#) >>{Toolbox Tool-Options}[Text Tool]
In {Tool Options} dialog Click the Font Button and choose Font.
#) >>{Tool Options} [Aa]-> "Alba Matter"
In {Tool Options} dialog Set Size to 15 px.
#) >>{Tool Options} Size = 15 px
In {Tool Options} dialog set Justify to Center.
#) >>{Tool Options} Justify = [Centered]
->@Approximate Position(Nove-Noga)
Still in Text Mode, you can change almost any parameter, size, font, color, etc.
Use the Move Tool to drag your Text Layer into the desired Postion.
Use the Alignment Tool to fine tune and Center the Text Layer.
If you want to make changes to the Text Layer, Rt-Click on the Layer in {Layers-Gradients and Select "Text Tool". Then Click in the Text Area.
6) As often as you feel the need, but definitely before proceeding to the next step, SaveAs your first NextStep of the Page you are working on. FBcover1, 2, 3, #+1.
#) >>File->SaveAs ('FBcover#+1.xcf') [Save/Enter]
Repeat 5 and 6 as often as necessary. At this point, you should have all of your Layers in place. There are tricks to organizing them and saving them for later. As you go along, these will become natural. One of the reasons that I started writing the GIMP Tutorials at the beginning was the awareness of how easy it is to Assume the Intermediate Steps. Step 7 assumes that you have a prepared Background image that is 851x315 Pixels, ready to Paste into this project.
7) Paste your Background Image in place above (FBcoverBase851x315.png) that you are using as the Background for this image.
In {Layers-Gradients} Select the bottom Layer (FBcoverBase851x315.png).
#) >>{Layers-Gradients}( FBcoverBase851x315.png)
Open your BackgroundImage851x315.
#) >>File->Open->("Name"='BackgroundImage851x315') [Open/Enter]
*NB: The File you opened is always behind the one you opened it from.
Select {'BackgroundImage851x315.xcf'}.
#) >>{'BackgroundImage851x315.xcf'}
Copy the Visible Image to the Clipboard.
#) >>Edit->CopyVisible
Select {FBcover#.xcf}.
#) >>{FBcover#.xcf}
***Note: Be Sure that the Current Selected Layer is the Bottom Layer on the List.
Paste Clipboard contents into {FBcover#.xcf}.
#) >>Edit->PasteAs->NewLayer
If you did this correctly, your BackgroundImage will appear behind all of your Layers but on top of FBcoverBase851x315.png. If not, make sure that the BackgroundImage is in the second position from the Bottom in {Layers-Gradients}. *Tip: You can delete the layer and try again as often as you like.
To Hide the BackgroundImage, (see FBcoverBase851x315.png again), Click the ['Eye'] Icon on the (BackgroundImage) Layer in {Layers-Gradients}. Click it again to turn it back on.
You can leave the (FBcoverBase851x315.png) Layer in place in case you need to make further adjustments. If size is an issue, you can delete it once you no longer need it. I tend to err on the side of caution. I would be a "belt and suspenders"man if I liked suspenders.
Optional:

Facebook Cover Overlay from Nove-Noga
Click Image. Save Full Size Image to your GIMP work area.
FBcoverOverlay851x315.png
8) SaveAs your first NextStep of the Page you are working on. EG:FBcover1, 2, 3, #+1.
#) >>File->SaveAs ('FBcover#+1.xcf') [Save/Enter]
Facebook only permits the use of PNG and JPG formats for your Facebook Cover Page. JPGs load faster, PNGs are better for Graphics and Text. The Default Format for GIMP is PNG.
***Note: Your First Export (Turning your .xcf into a png) may go to the Default Directory unless you Choose or Create one. For most people, the Default Directory is MyDocuments.
9) Export your Saved Project as PNG.
#) >>File->Export
In {Export Image} Verify png extension and Check the name.
(Multiple Exports may default to previous name.)
Verify or Select/Create the desired Folder.
When you are ready, Click [Export] or Hit [Enter]. Otherwise [Escape] to return to Project.
#) {Export Image} [Export/Enter]
In {Export Image as PNG} Click/hit [Export/Enter].
#) {Export Image as PNG}[Export/Enter]
*Note: I don't make any changes to the Export Parameters.
10) Upload your new Facebook Cover Photo to Facebook.
Go to your Facebook Page.
Click on the Update Cover Photo Icon 'Camera'.
Choose "Update Photo..."
In the {Open} Dialog Box, select your new Facebook Cover Photo and Click [Open].
*Note: Varies by Browser.*
No Reposition should be necessary. Click [Save Changes].
*-*-*-*-*-*-*-*
 For more information on GIMP
and a working list of my GIMP Tutorials,
go to:
http://nove-noga.com/GIMP.html
Time is your most precious commodity.
Do as much with your time as you can.
Nothing Ventured - Nothing Gained.
Nove-Noga!
