Nove-Noga Info Post
Nove-Noga: Facebook Image with GIMP
If you found this page useful,Please Like and Share. Thank you.
Nove-Noga!

 Nove-Noga: Facebook Image with GIMP.
The push that Dennis Thorgesen of Lisech eMarketing gave me in the Fall of 2012 got me to thinking about other places that I could place my Logo and face to better effect. I was using the same image for all of my Facebook Profile Pictures. I decided to make a new Facebook Profile Picture for my Fan Page. http://www.facebook.com/MyNoveNoga
To start, I created a composite of the photo that I resized for my website and added two Logo elements. I used the blue from my Nove-Noga.com website as a background. I was so pleased with myself. Until I saw the effect against the early morning Las Vegas shot that I was using for my Facebook Nove-Noga header. The best term that I could come up with was "discord".
I decided that for my Facebook Profile Picture it would be better to use a white background. The optimum size for Facebook Profile Photos is 180x180 Pixels. The image is displayed in a 160x160 format. Don't ask me why. That is just how Facebook does it.
For this Free GIMP project, we will start with a 180x180 white background and add our image and text to it.
Redo of GIMP FBpic.jpg:

Notation methods:
Each instruction line is usually in two parts. Verbal then Symbols.
"#)" The Symbol line will begin with "#)".
EG: #) >>File->Open("Name" = 'work image')[Open/Enter]
">>" Means Select, from the main menu if no {Dockable Dialog} or other source is indicated.
The square brackets mean [click this button].
The parenthesis mean (your entered info) E.G. (picname.xcf)
"Rt>" Means Right Click with your Mouse
"->" Click or Select
"->>" Double Click
">v" Click DropDown button
"^>" Shift + Click
" "literals" " The quotes usually contain what has been referred to as "Literals" meaning that that is exactly/literally what you should see.
" 'Described Item frequently an Icon' " EG: IBO Edit Icon 'Paper&Pencil'
[Action/Enter] is for the Option to Click the button or Hit the Enter key.
"*NB:" is for the Latin "Note Bene" which I interpret as Good Note or Note Well.*
"EG:" is for the Latin "Exempla Gratia" I use it when illustrating an example. See above.
Selection Synonyms: Click, Select, Choose,...
For more info on notation and standard practices see: "GIMP Notation and Descriptions"
*-*-*-*-*
1) Fire up the GIMP Tool
#) >>GIMP
2) Create a New xcf file 180x180 in the current Background Color
#) >>File->New{Create a New Image} Width=180 Height=180 [Okay/Enter]
3) Save your new project (projectName#) in a new folder (projectName) with a number at the end of the project name images so that you can sequence your saves. *NB: This is very helpful when you suddenly decide to change direction from several steps back.*
#) >>File->SaveAs ('projectName1.xcf') ->( "Places" = "My Documents") ->>("Name" = "GIMP") ->[Create Folder] >('project folder')[Enter] [Save/Enter]
Let's start with the text that you want to add first. You can always resize or crop the image you want to use to fit the results. I started with "Nove-Noga" in the Alba Matter Font with the Font Size set to 18 and my Color set to 0000ff.
4) Set up Text Tool; Font=Alba Matter; Size 18px; Justify=Centered.
In {Toolbox Tool-Options} dialog select [Text Tool] (the "A" Icon).
#) >>{Toolbox Tool-Options}[Text Tool]
In {Tool Options} dialog Click the Font Button and choose Font. *NB: Default is Sans.*
#) >>{Tool Options} [Aa]-> "Alba Matter"
In {Tool Options} dialog Set Size to 18 px
#) >>{Tool Options} Size = 18 px
In {Tool Options} dialog set Justify to Center
#) >>{Tool Options} Justify = [Centered]
In {Tool Options} dialog set Color to 0000ff. Click the Color Box. Set HTML notation to 0000ff.
#) >>{Tool Options} [Color box] Set HTML notation = 0000ff
5) Click anywhere on your image. Key-in your text. EG: Nove-Noga
#) >>{"' projectName1.xcf'"}
Enter your text.
#) ('text')
6) Roughly position your new element.
Select the [Move Tool] from {Toolbox}
#) >>{Toolbox}[Move Tool]
Position Cursor over selected element and shift+click to drag the element to desired position.
#) ^>('selected element') Drag to desired position.
*Note: To Return to the Text Tool for an Element, Right-Click the Element in the Layers-Gradients list. Then Select Text Tool from the Menu. Click on the Element to adjust text. This will activate the Tool Options again. There you can adjust any of the parameters for your Text Element. In fact, for my Project, I increased the Font Size to 25.*
7) Repeat Steps 4, 5 & 6 for your second element/layer.
*NB: To use the Move Tool on a different element/layer.
Select ('desired element/layer') from {Layers-Gradients}
#) >>{Layers-Gradients}('desired element/layer')
Once your elements are in their approximate position, you can easily adjust them with the Alignment Tool. {Toolbox}[Alignment Tool] ('Box with four arrows pointing out') I usually get the vertical positioning as desired and use the Alignment tool to center them horizontally. The bottom set of buttons for the Alignment Tool allow you to set the offsets for the tools to the nearest pixel.
8) Center your Text Element(s) horizontally with the Alignment Tool.
#) >>{Toolbox}[Alignment Tool] Click element/layer.
Center element horizontally relative to First item.
#) >>{Tool Options}[Align center of target]
Repeat as necessary.
*Important: Use the mouse pointer and the information at the bottom of your Project Window to determine the size of the Image that you are going to use. It appears that I want something about 160x100. This gives me a ratio of 1.6 to 1.*
9) Open the Image that you are going to be using for this project. I recommend the largest version you have. You can always Resize it down. Going up is a problem.
#) >>File->Open ("Places"="MyDocuments") ->>("Name"="GIMP") ->>("Name"="'WorkArea'") ->("Name"='original picture') [Open/Enter]
*Tip: The Open Image process frequently places it behind your current work area. Minimize and Restore it to bring it to the front.*
10) Using the Rectangle Select Tool, Select the portion of the Image that you wish to place in your Project. Pay special attention to the Ratio Indicator at the bottom of the Project Window. After you let go of the mouse button, you can still adjust the edges.
#) >>{Toolbox}[Rectangle Select Tool]
Set Top left corner of selected area by clicking on the Image and holding the button down. Adjust the edges as necessary.
11) If it didn't come out right the first time, don't sweat it, GIMP makes it easy to undo steps. Simply Undo and repeat step 10 until you are pleased with your selection.
#) >>Edit->Undo Select
Return to Step 10. Repeat as necessary.
12) Once you are pleased with your Selection, Copy the selected Pixels to the Clipboard.
#) >>Edit->Copy
13) Create a new Image with the contents of the Clipboard.
#) >>File->Create->From Clipboard to create a new image for your project.
14) Save this image as part of your Project in case you want to make changes later. Be sure to check the target folder. I hate it when it goes somewhere else.
#) >>File->SaveAs ('projectName2.xcf') [Save/Enter]
15) Scale your image down to the size that you need. Enter your target width in the box, then hit the Tab key. If the height number is the one you wanted, then you have the Ratio correct.
#) >>Image->Scale Image {Scale Image} Width=160 [tab][Scale]
16) Save your Resized (Scaled) Image as the next image in your project set.
#) >>File->SaveAs ('projectName3.xcf') [Save/Enter]
17) Copy the entire Image onto the Clipboard.
#) >>Edit->Copy
18) Select your original Project Image with your text in place. Paste the Clipboard Contents into the Project as a new layer. It will land in the upper left corner of the Project Image.
#) >>{ 'projectName1.xcf'}
#) >>Edit->Paste As->New Layer
19) Use the Move Tool to position your new Layer Approximately where you want it.
#) >>{Toolbox}[Move Tool]
Shift-Click the New Layer and drag to the desired position.
#) ^>('selected element') Drag to desired position.
20)Use the Alignment Tool to Center your Image Layer.
#) >>{Toolbox}[Alignment Tool] Click layer.
Center element horizontally relative to First item.
#) >>{Tool Options}[Align center of target]
Repeat as necessary.
*Tip: When using the Alignment Tool, I frequently use it to move the layer to the edge of the project and then center it. That makes it easier to verify that the action actually took place. Also, you can use the offset tool for adjustments as desired. Experiment with the numbers until you get the balance that you are looking for. *NB: Sometimes the offset uses negative numbers. *
21) Save the completed Project as the next image in your project set.
#) >>File->SaveAs ('projectName4.xcf') [Save/Enter]
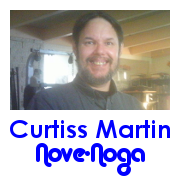 Now that your project is complete, you need to Export it to an acceptable file structure. For Facebook, that is either PNG or JPG. The Default Export is PNG. Be Aware that you need to choose a Directory on your First Export. Otherwise, it will go to the default directory which is probably "My Documents".
22) Export your Project
#) >>File->Export [Export/Enter] {Export Image as PNG}[Export/Enter]
23) Upload your new Profile Picture to your Facebook Page.
Open your Facebook Page.
Click Update Profile Picture.
Click Upload Photo...
Select your new Project Image.
Click [Open/Upload]
Look at your new Profile Picture on the page and the Comments to make sure it looks good. If not, well, you know what to do now. Have a little fun.
I could probably have done this Project in less than ten minutes now that I know how to do thing with GIMP. Work on a few of the projects on the GIMP Tutorials Page and soon you will wonder why you were having any troubles. The Free GIMP Tool is an incredibly powerful tool for Image Manipulation. Let your imagination Run!
See the results of this exercise at http://www.facebook.com/MyNoveNoga. That is one of the places where I share information on the Internet.
 For more information on GIMP
and a working list of my GIMP Tutorials,
go to:
http://nove-noga.com/GIMP.html
Time is your most precious commodity.
Do as much with your time as you can.
Nothing Ventured - Nothing Gained.
Nove-Noga!
